In this tutorial, we will learn how to validate Spring boot REST API DTO requests using Hibernate validator.
Check out my bestseller Udemy courses:In Java, the Java Bean Validation framework has become the de-facto standard for handling validations in Java
projects.
JSR 380 is a specification of the Java API for bean validation and this ensures that the properties of a
bean meet specific criteria, using annotations such as @NotNull, @Min, and @Max.
Hibernate Validator is the reference implementation of the validation API.
We create and use DTOs (Data Transfer Objects) to transform data between client and server.
Data Transfer Object Design Pattern is a frequently used design pattern. It is basically used to pass data
with multiple attributes in one shot from client to server, to avoid multiple calls to a remote server.
Instead of adding Java Bean Validation annotations to JPA entities, we will add Java Bean Validation
annotations to DTO because we will use DTO in the request and response of the REST API.
Check out the complete list here at https://www.sourcecodeexamples.net/2021/03/java-bean-validation-annotation-list.html
Spring boot provides good integration support with Hibernate validator.
We will use Hibernate Validator, which is one of the reference implementations of the bean validation API.
Starting with Boot 2.3, we need to explicitly add the spring-boot-starter-validation dependency:
<dependency>
    <groupId>org.springframework.boot</groupId>
    <artifactId>spring-boot-starter-validation</artifactId>
</dependency>Let's create a step-by-step example to demonstrate how to validate the Spring boot REST API DTO request using Hibernate validator.
Use the below guide to create a Spring boot project in Eclipse STS IDE:
- Give project name as springboot-validation.
- Add the below dependencies to this project:
After creating the spring boot project, verify your pom.xml with the below pom.xml file:
<?xml version="1.0" encoding="UTF-8"?>
<project xmlns="http://maven.apache.org/POM/4.0.0" xmlns:xsi="http://www.w3.org/2001/XMLSchema-instance"
	xsi:schemaLocation="http://maven.apache.org/POM/4.0.0 https://maven.apache.org/xsd/maven-4.0.0.xsd">
	<modelVersion>4.0.0</modelVersion>
	<parent>
		<groupId>org.springframework.boot</groupId>
		<artifactId>spring-boot-starter-parent</artifactId>
		<version>3.0.4</version>
		<relativePath/> <!-- lookup parent from repository -->
	</parent>
	<groupId>net.javaguides</groupId>
	<artifactId>springboot-validation</artifactId>
	<version>0.0.1-SNAPSHOT</version>
	<name>springboot-validation</name>
	<description>Demo project for Spring Boot and Hibernate Validator</description>
	<properties>
		<java.version>17</java.version>
	</properties>
	<dependencies>
		<dependency>
			<groupId>org.springframework.boot</groupId>
			<artifactId>spring-boot-starter-data-jpa</artifactId>
		</dependency>
		<dependency>
			<groupId>org.springframework.boot</groupId>
			<artifactId>spring-boot-starter-validation</artifactId>
		</dependency>
		<dependency>
			<groupId>org.springframework.boot</groupId>
			<artifactId>spring-boot-starter-web</artifactId>
		</dependency>

		<dependency>
			<groupId>com.h2database</groupId>
			<artifactId>h2</artifactId>
			<scope>runtime</scope>
		</dependency>
		<dependency>
			<groupId>org.springframework.boot</groupId>
			<artifactId>spring-boot-starter-test</artifactId>
			<scope>test</scope>
		</dependency>
	</dependencies>

	<build>
		<plugins>
			<plugin>
				<groupId>org.springframework.boot</groupId>
				<artifactId>spring-boot-maven-plugin</artifactId>
			</plugin>
		</plugins>
	</build>

</project>
Let's create a new model package. Inside this model package, create a User JPA class and add the following content to it:
package net.javaguides.springboot.model;

import jakarta.persistence.*;

@Table(name = "users")
@Entity
public class User {

	@Id
	@GeneratedValue(strategy = GenerationType.IDENTITY)
	private long id;

	@Column(name = "name", nullable = false)
	private String name;

	private String email;

	private String password;

	public User() {

	}

	public User(String name, String email, String password) {
		super();
		this.name = name;
		this.email = email;
		this.password = password;
	}
	public long getId() {
		return id;
	}
	public void setId(long id) {
		this.id = id;
	}
	public String getName() {
		return name;
	}
	public void setName(String name) {
		this.name = name;
	}
	public String getEmail() {
		return email;
	}
	public void setEmail(String email) {
		this.email = email;
	}
	public String getPassword() {
		return password;
	}
	public void setPassword(String password) {
		this.password = password;
	}
}Let's create a dto package. Inside dto package, create UserDto class and add the following content to it:
package net.javaguides.springboot.dto;

import jakarta.validation.constraints.Email;
import jakarta.validation.constraints.NotEmpty;
import jakarta.validation.constraints.Size;

public class UserDto {

	private long id;

	// user name should not be null or empty
	// user name should have at least 2 characters
	@NotEmpty
	@Size(min = 2, message = "user name should have at least 2 characters")
	private String name;

	// email should be a valid email format
	// email should not be null or empty
	@NotEmpty
	@Email
	private String email;

	// password should not be null or empty
	// password should have at least 8 characters
	@NotEmpty
	@Size(min = 8, message = "password should have at least 8 characters")
	private String password;

	public UserDto() {

	}

	public UserDto(String name, String email, String password) {
		super();
		this.name = name;
		this.email = email;
		this.password = password;
	}
	public long getId() {
		return id;
	}
	public void setId(long id) {
		this.id = id;
	}
	public String getName() {
		return name;
	}
	public void setName(String name) {
		this.name = name;
	}
	public String getEmail() {
		return email;
	}
	public void setEmail(String email) {
		this.email = email;
	}
	public String getPassword() {
		return password;
	}
	public void setPassword(String password) {
		this.password = password;
	}
}
Note that we have added below Java bean validation annotations to UserDto class:
Spring boot automatically configures database details for H2 in-memory database so we no need to explicitly add the database configuration in the application.properties file.
Let's create a repository package. Inside this package, create a UserRepository class that talks with the database. Add the following content to it:
package net.javaguides.springboot.repository;

import org.springframework.data.jpa.repository.JpaRepository;

import net.javaguides.springboot.model.User;

public interface UserRepository extends JpaRepository{

}
Let's create a service package. Inside this package, create a UserService class and add the following code to it:
package net.javaguides.springboot.service;

import org.springframework.beans.factory.annotation.Autowired;
import org.springframework.stereotype.Service;

import net.javaguides.springboot.model.User;
import net.javaguides.springboot.repository.UserRepository;

@Service
public class UserService {

	@Autowired
	private UserRepository userRepository;

	public User createUser(User user) {
		return userRepository.save(user);
	}
}Let's create a controller package. Inside this package, create a UserController class and add the following content to it:
package net.javaguides.springboot.controller;

import jakarta.validation.Valid;

import org.springframework.beans.factory.annotation.Autowired;
import org.springframework.http.HttpStatus;
import org.springframework.http.ResponseEntity;
import org.springframework.web.bind.annotation.PostMapping;
import org.springframework.web.bind.annotation.RequestBody;
import org.springframework.web.bind.annotation.RequestMapping;
import org.springframework.web.bind.annotation.RestController;

import net.javaguides.springboot.model.User;
import net.javaguides.springboot.dto.UserDto;
import net.javaguides.springboot.service.UserService;

@RestController
@RequestMapping("/api/")
public class UserController {

	@Autowired
	private UserService userService;

	@PostMapping("users")
	public ResponseEntity< UserDto> createUser(@Valid @RequestBody UserDto userDto){

		// convert UserDto to User entity
		User user = new User();
		user.setName(userDto.getName());
		user.setEmail(userDto.getEmail());
		user.setPassword(userDto.getPassword());
		User savedUser = userService.createUser(user);

		// convert User entity to UserDto class
		UserDto userResponse = new UserDto();
		userResponse.setId(savedUser.getId());
		userResponse.setName(savedUser.getName());
		userResponse.setEmail(savedUser.getEmail());
		// don't provide password to client
		// userResponse.setPassword(savedUser.getPassword());

		return new ResponseEntity< User>(userResponse, HttpStatus.CREATED);
	}
}
Note that we enable validation on Spring Rest Controller by adding @Valid annotation in addition to @RequestBody in the createUser() method.
Let's create a ValidationHandler to customize the validation response.
To customize response validation, we need to extend ResponseEntityExceptionHandler class and
override handleMethodArgumentNotValid(MethodArgumentNotValidException ex, HttpHeaders
headers, HttpStatus status, WebRequest request ) method.
Let's create ValidationHandler class and add the following content to it:
package net.javaguides.springboot.controller;

import java.util.HashMap;
import java.util.Map;

import org.springframework.http.HttpHeaders;
import org.springframework.http.HttpStatus;
import org.springframework.http.ResponseEntity;
import org.springframework.validation.FieldError;
import org.springframework.web.bind.MethodArgumentNotValidException;
import org.springframework.web.bind.annotation.ControllerAdvice;
import org.springframework.web.context.request.WebRequest;
import org.springframework.web.servlet.mvc.method.annotation.ResponseEntityExceptionHandler;

@ControllerAdvice
public class ValidationHandler extends ResponseEntityExceptionHandler{

	@Override
	protected ResponseEntity< Object> handleMethodArgumentNotValid(MethodArgumentNotValidException ex,
			HttpHeaders headers, HttpStatus status, WebRequest request) {

		Map< String, String> errors = new HashMap< >();
		ex.getBindingResult().getAllErrors().forEach((error) ->{

			String fieldName = ((FieldError) error).getField();
			String message = error.getDefaultMessage();
			errors.put(fieldName, message);
		});
		return new ResponseEntity< Object>(errors, HttpStatus.BAD_REQUEST);
	}
}Run the Spring boot application with the main class:
package net.javaguides.springboot;

import org.springframework.boot.SpringApplication;
import org.springframework.boot.autoconfigure.SpringBootApplication;

@SpringBootApplication
public class SpringbootValidationApplication {

	public static void main(String[] args) {
		SpringApplication.run(SpringbootValidationApplication.class, args);
	}
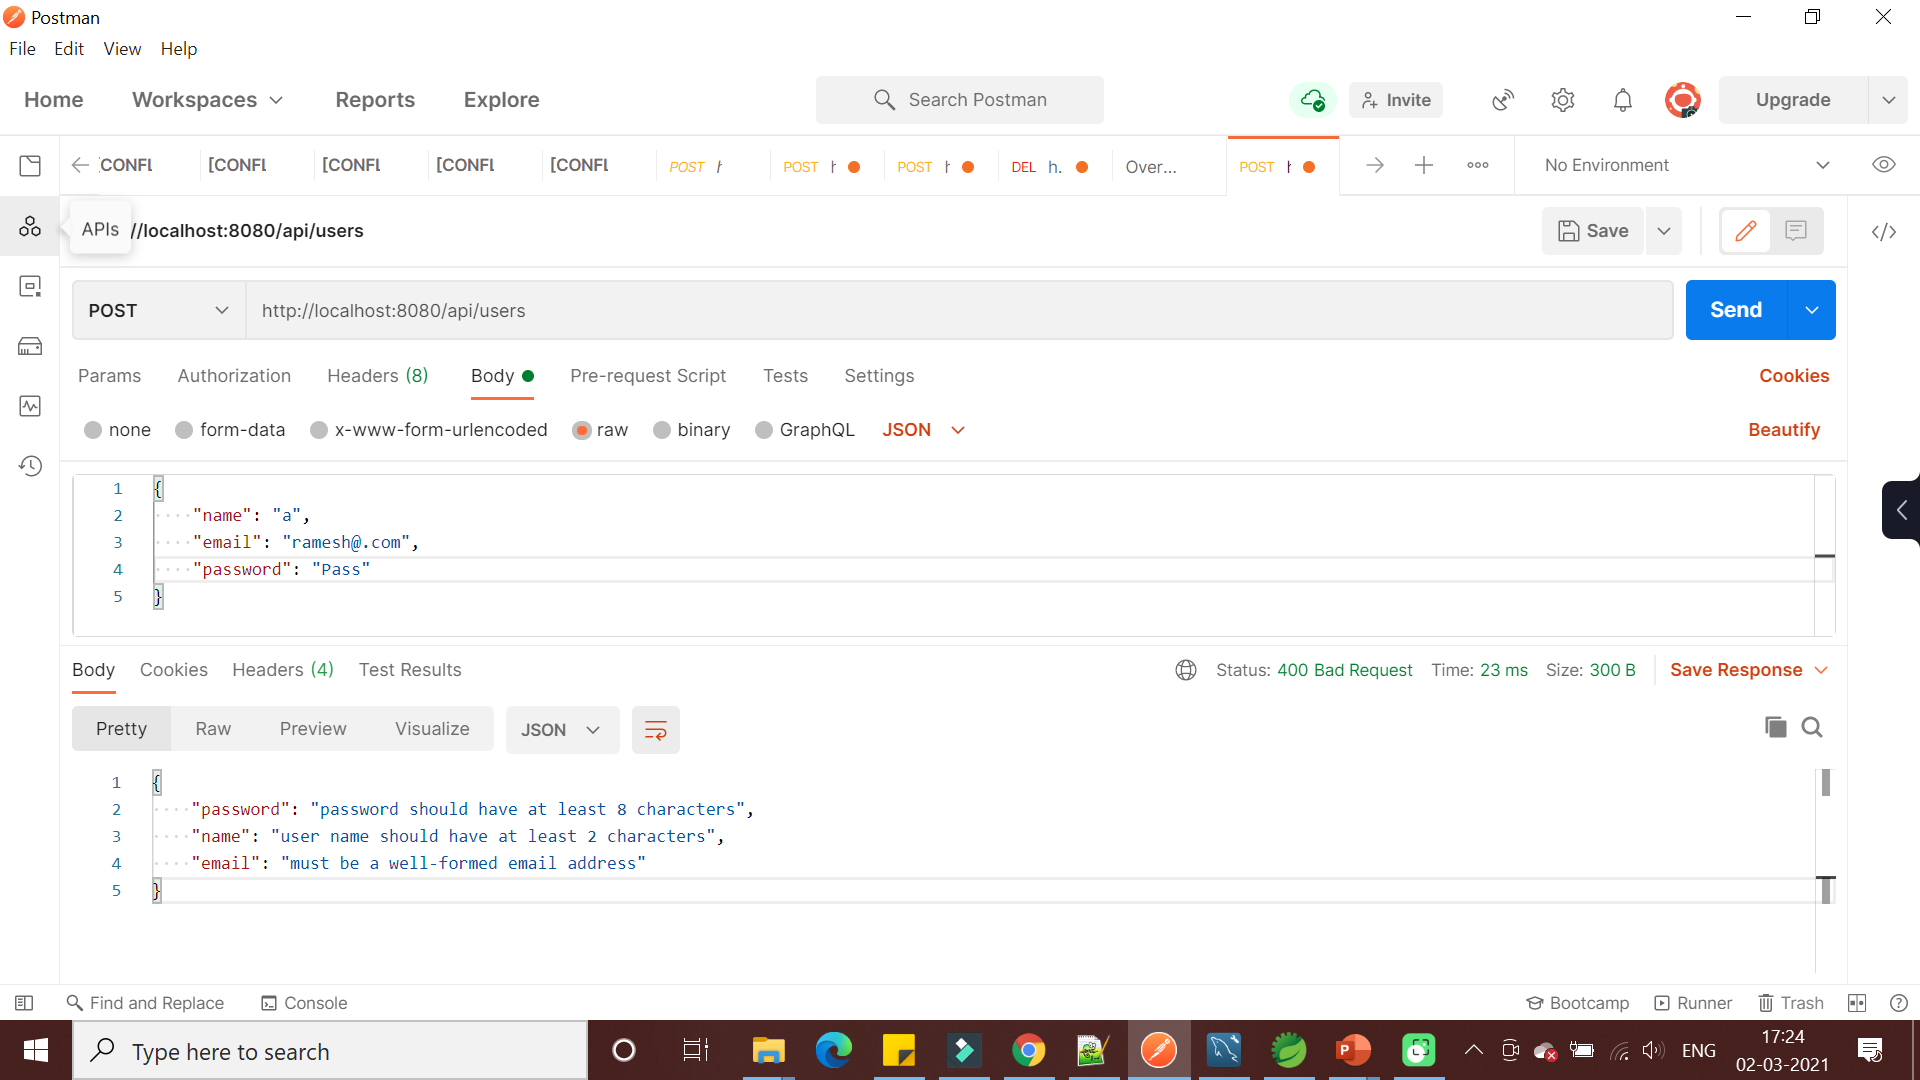
}The below screenshot shows the validation of Spring boot REST API using Hibernate validator:
In this tutorial, we learned how to validate DTO objects in Spring boot REST API using Hibernate validator.
The source code of this tutorial available on my GitHub repository athttps://github.com/Sai/springboot-validation
Starting with Boot 2.3, we need to explicitly add the spring-boot-starter-validation dependency:
<dependency>
    <groupId>org.springframework.boot</groupId>
    <artifactId>spring-boot-starter-validation</artifactId>
</dependency>